DIY Chalk Paint Project

Well, Caroline and I have now been in our new home for over a MONTH!
Now that we're settled, we are planning how to fill up the empty rooms, hopefully without breaking the bank! One of the ways we are doing this is by repurposing furniture from Goodwill.
Caroline's birthday was this week, so I decided for her gift, I would try a DIY chalk paint project!
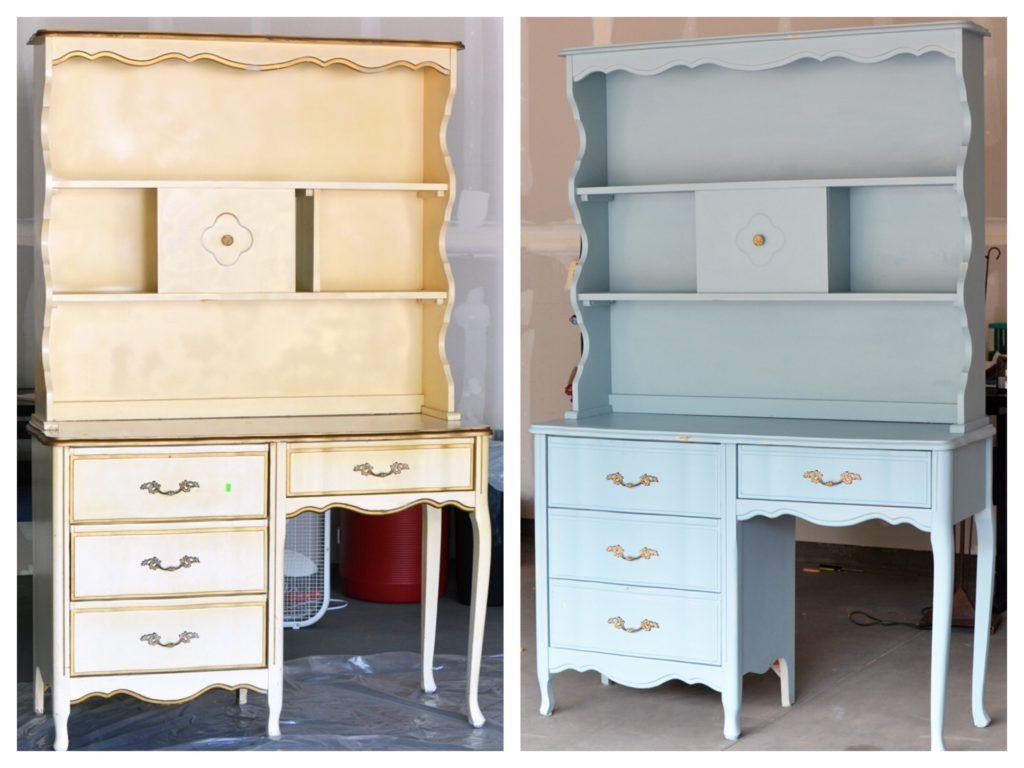
We found this hutch at Goodwill, and Caroline loved the shapes of the piece. We also both liked the cool gold-white hardware! It was marked for $75, and we decided if they'd go down to $50 we'd take it. The manager at the store agreed, and then he ended up selling it to us for $30--WHOA! Thank you Goodwill for the wedding gift!

We wanted this hutch for our "French Room" (aka dining room). Somehow all our rooms have inherited cute names like this. The dining room has some French accents in it, so I decided to paint the hutch in a French Provincial style--kind of a soft, rustic blue look.
Picking DIY Chalk Paint Colors
At first my plan was to paint with 5 DIFFERENT chalk paint colors. I've never done this before, so I had no idea this wasn't normal!
Here was my inspiration to do french provincial furniture--this project by Edith and Evelyn. Absolutely stunning! But this is also a more *advanced* project than I probably have any business doing right now! The lady at Lowes WISELY talked me into starting with just 2 colors for my first chalk paint DIY.

I literally spent an hour picking out the colors--I must have looked like a crazy person pacing around the paint aisle. Which would be accurate...I am a little crazy!

To add to the craziness, I ripped up the brochure of swatches so I could look at the ones I liked right next to each other. But how else are you supposed to do it??

The lady behind the counter was so sweet. I literally stopped her and changed my mind twice about the colors before I let her mix them! But finally we had our 2 colors! I decided on 2 colors of Valspar Chalky Finish paint: Trousseau Blue and Moonstone Ring (white).

These were $30 each, and then I also bought their Sealing Wax for $13, as well as a fancy chalk paint brush for $8. I had a 10% off gift card for Lowes, so the total came to $81.

The paint department lady seemed to be excited for me despite my craziness! She wants me to come back with a photo--hopefully not so she can get a good laugh at what this newbie made!
Preparing to Paint the Furniture
To start, I scrubbed all the dust out of the hutch, and that was when I found this:

Yuck! Black mold in the drawers! Probably should have noticed that at Goodwill!
I scrubbed at it for 20 minutes, but the mold was in DEEP. And on top of that, the drawers had a weird diaper smell.
Honestly I was about to call the project quits, but Caroline suggested cutting the front of the drawers off and gluing them to the desk. Perfect! The inside of the drawers were the only thing with mold, and we don't need this furniture for storage.
Painting the Furniture
Alright, ready to begin the DIY chalk paint project!
I removed the hardware, and put on 2 coats of Valspar Moonstone Ring. C helped out too!

Oh the differences between a Type A and a Type B personality! See how orderly her lines are? Literally perfect. I on the other hand had drippy paint everywhere!

Another weird thing: flies LOVE this paint. I don't get it, do they put sugar in this stuff? Every morning I came into the garage to work on this, there were little dead flies on the furniture. Don't worry, I won't show a pic, the black mold was gross enough!
Next I painted 2 coats of Valspar Trousseau Blue. I had wanted to do one coat and try the wet distress method, but you could still see the white underneath after one coat. After 2 coats I decided to distress with a sanding block.


I didn't go crazy on the distressing, but I may go back later and do more! Our goal wasn't a shabby look, but we do like the *vintage* feel of distressed stuff!
Next I painted the wax finish over everything. You spread the wax over the whole surface with your brush, let it sit for a couple minutes, then wipe off the excess with a lint-free cloth. I used an old t-shirt. Working with the wax was kind of slimy and gross, but the wax does dry on the furniture after a while and loses its *waxy* feeling.
And then I sawed the fronts off the drawers. No more diaper smell!

C helped me re-attach the hardware and glue in the drawers. I used E6000 glue, and oh boy do I recommend ventilation. I use this glue for the bullet jewelry we produce, and I actually wear a gas mask!

Looking pretty good! The hardware works great with the new colors.

DIY Chalk Paint Finished Product
And here it is! C loved her birthday present, and I loved my DIY chalk paint project.


I think Rory likes the new furniture too!

Thoughts on my DIY Chalk Paint Project
- It was more work than I expected. 4 coats of paint and 1 coat of wax, including buffing out the wax after application. Next time, I'd like to try and make the coats go further and do half as much work.
- The blue was closer to baby-blue than I wanted. I was scared to go too dark, but next time I'll be bolder.
- I want to use 2 very different colors next time to try and get a more dramatic effect.
- Next time I need a grittier sanding block to really distress the top and sides. Edges are a breeze to distress, but the flat surfaces are much tougher!
- Proper ventilation is a must. Keep a fan running.
- I can do it! I was intimidated to start, but now I feel motivated to do more projects with chalk paint.
- This was a ton of fun! Seeing the dramatic transformation of this $30 piece of furniture was an absolute blast.

Have you tried any fun projects lately? Let me know in the comments!